|
|
|||
|
Lou Is New user 73 Posts 
|
I have wooden balls.
what is the best way to paint them with even, glossy finish? Wooden for painting. |
|
Michael Baker Eternal Order Near a river in the Midwest 11172 Posts 
|
The way I do it...
Get a large sewing needle, the longer, the better. You want one that is sturdy and has a large eye. Use a tack hammer and drive this into the ball, as you would a nail. Exercise care doing this, as needles are fairly brittle and you can easily break it. Drive it in about 1/4" so it holds good. Now, thread a short length of fine wire through the eye, tying it into a loop, maybe 1"-1.5" diameter. You will use this to hang the ball, so also find a convenient location to position some hooks. You will need one for every ball you will be painting. The reason for using fine wire is that it will retain an open shape, making it easier to hang the ball when you need to. You will want to use primer first. Hold the ball by the needle so the bottom of the ball is uppermost (assuming the needle is the top). Give it a light spray with primer (wear a glove if you don't want paint on your fingers). This will allow you to easily spray one hemisphere at a time. Turn it upright and spray the upper half. Hang it from the hook, let it dry and repeat as necessary to get a smooth surface with no wood grain showing through. It helps to rub the ball between coats with #0000 (extra fine) steel wool. This helps even the finish. OK, now you are ready to start your color coats. Follow the same basic procedure, making sure you don't spray so heavy that the paint begins to run. If it does, you'll have to babysit it for awhile, rotating the ball by the needle until the runs level and begin to set. Apply as many coats as needed to get a nice finish. Finally, apply a couple coats of clear gloss, the same way you did the others. The clear coat is necessary if you don't want balls of different colors "trading" paint. Now let the balls sit untouched in a dust free area for at least a week... longer if possible. This lets the finish cure more, so you don't get fingerprints in your finish. Dry paint is not necessarily cured paint. When ready, remove the needle with a twisting motion. This will minimize any paint breaking off and going with the needle. A pair of pliers will help with this. In most cases, I have not found it necessary to repair the needle hole. They never show up to an audience.
~michael baker
The Magic Company |
|
Bill Hegbli Eternal Order Fort Wayne, Indiana 22797 Posts 
|
As I remember Lewis Ganson or Geoffrey Buckingham (can't remember which book) published their methods in their books. It said to use lacquer paint in a can an dip the balls. Maybe that was before spray paint was around. Then to place the needle in a board, spaced with holes for the needles, so the paint would run down the needle, if it did run. Any paint build up around the needle can be cut close to the ball with an X-Acto knife before removing the pin.
With spray paint, you can make a lazy Susan type spin table, remember to move the spray from top to bottom as spray will not hit the top or bottom with directly spraying on that area. Wear a good paint spray mask and do it outside. I didn't and had to go to hospital, could not breath. Get a large box and cut the top and front off. This will keep any dust and bugs off and stop the wind from blowing the paint off it's target. |
|
Michael Baker Eternal Order Near a river in the Midwest 11172 Posts 
|
Not trying to be nasty here, but do you want to take your advice from someone who put himself in the hospital trying to do what you want to do? Of course, you should paint with plenty of ventilation. Read the label.
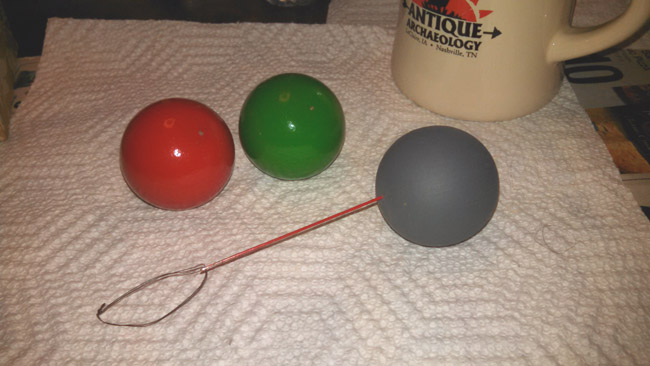
Lacquer is NOT what you want to use. It does not cure the same way and continues to sink into the wood over time. Lacquer is also very toxic and will make you sick very quickly. It is not for amateurs. Dipping is quick, but it also puts on a thick coat, which usually has no choice but to run and drip. Lacquer dries extremely fast, and self-levels, which can be nice for some some applications. But, you can be painting one minute, and be on the floor the next. Stay away from it. The original method used by Thayer (probably one of the earliest makers of commercial billiard balls) was to dye the wood and then dip them (several coats) in cut shellac. It has a beautiful finish and a wonderful "cling", but it doesn't last and would need to be re-done. How often would depend on the amount of use the balls get. The big problem with dipping is that ugly "nipple" that forms at the lowest point. Having the needle down merely positions that nipple where there is already going to be a blemish (needle hole). Cutting away the excess, sanding, or whatever will usually not give you the best results. The old German-made wooden Multiplying Ball sets were likely dipped, as they typically have a more pronounced nipple. They are very nice, but if you have the advantage of better technology, why not take advantage of it? I just took the first photo below, which shows a few balls I have in the works. These are 1.5". The one on the needle has had a few light coats of gray primer. (A sharp eye will notice a discrepancy... The reason why the needle is red instead of gray is because I replaced with a better needle and have not done any more spraying since then.  ) )
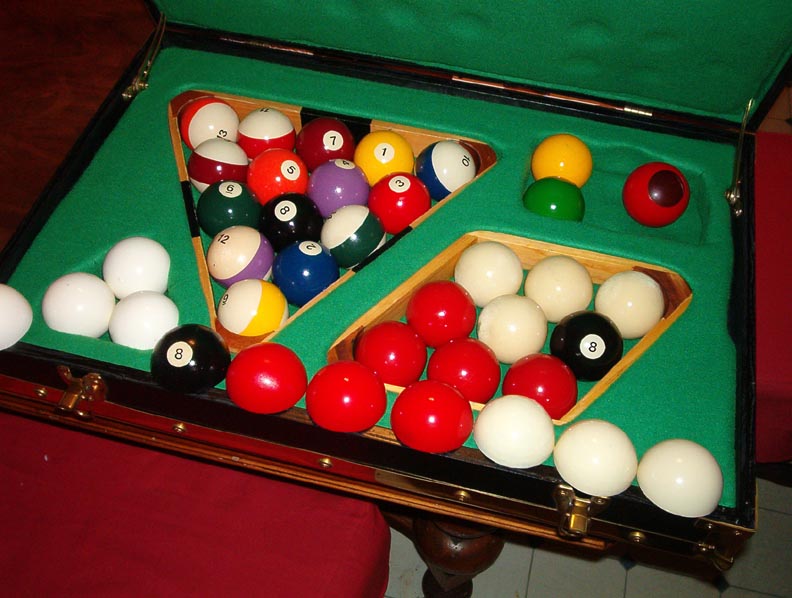
The red and green balls are done. If you look closely, you can see the needle holes in both.  This next photo shows a set of 2 1/4" balls that I painted several years ago so as to resemble the real thing. All are wood, except for the shells and the hollow ball. 
~michael baker
The Magic Company |
|
Bill Hegbli Eternal Order Fort Wayne, Indiana 22797 Posts 
|
Michael, I mentioned what the books wrote, that was not my process as I continued with some ways of painting with spray. I did not use lacquer paint, but there are very good automobile paints that come in a spray can that would work. My choice was Rust-olum because of it tough quality. My favorite primer Bin white primer, it has a shellac base, but also is great for the paints to join together very well.
Yes, as a do it yourselfer, I only had a basement, I don't have the advantage of setting up a spray booth with a ventilation system. I did go and by a paint mask, and all was good to finish my project. A better paint to use, in my opinion, is epoxy paint, the toughest paint available, but it can be hard to work with because of humidity. |
|
Lou Is New user 73 Posts 
|
Thank you for your post, Michael. It's nice to hear from someone who knows what they are talking about!
Very nice work, btw. |
|
Michael Baker Eternal Order Near a river in the Midwest 11172 Posts 
|
You are most welcome!
Just FYI - Check the thread on when not to do it yourself (also here in The Workshop). You may find a few extra bits of info that could help. Good luck with your project and have fun.
~michael baker
The Magic Company |
| The Magic Cafe Forum Index » » The workshop » » Painting balls (3 Likes) | |
| [ Top of Page ] |
|
All content & postings Copyright © 2001-2024 Steve Brooks. All Rights Reserved. This page was created in 0.03 seconds requiring 5 database queries. |
|
The views and comments expressed on The Magic Café are not necessarily those of The Magic Café, Steve Brooks, or Steve Brooks Magic. > Privacy Statement < 

 |


